
Time for celebration!
Summer is often one party from beginning to end. Many celebrate the holiday with small and slightly larger cookies, and many weddings, Rippijuhlat and birthdays fall in the Finnish summer. Throughout the ages, the Finnish feasting tradition has included a wide range of salty and sweet delicacies, but the uncrowned queen of the festive table is still the filled cake.
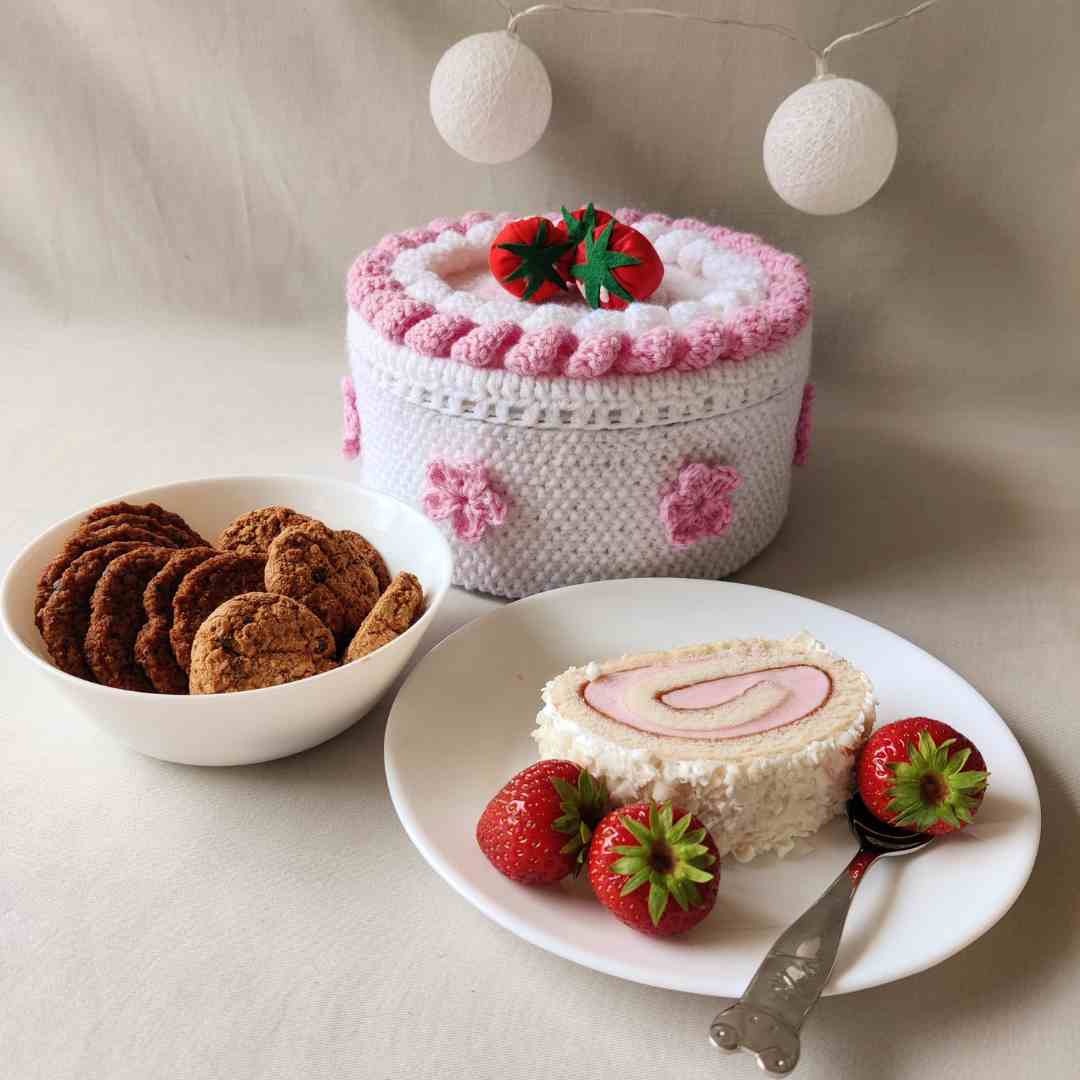
Have you ever thought that a filled cake can be more than a delicious centerpiece of a party? If only you could make a spectacular long-lasting cake that remains juicy from party to party and is guaranteed to attract attention among guests. The cake can hide, for example, cookies or candies, and thus also functions as a serving dish.
With the help of tuna stories, you can create a lasting favorite for the coffee table that will pleasantly surprise your guests again and again.

First of all, you need a tin box with a lid. This recipe uses a Christmas peppercorn jar. Depending on the color of the box, it is also good to use light-colored lining fabric to cover the patterns and the color of the jar. In addition, you need glue, white knitting yarn in the color of cream foam and pink knitting yarn in the color of strawberry foam. The cake will be decorated with strawberries, and for these you will need different red fabric scraps, even small scraps go a long way. In addition to these, green felt or fabric for strawberry stems.

Measure the circumference and height of the tin can without the lid. Reduce the height as much as the lid of the jar takes when it is closed. Cut a suitable strip of light-colored underwear that goes around the jar, but not all the way to the top. Also cut a circle the size of the cover from the fabric. Cut a thin strip for the edge of the lid. Glue the fabrics in place to the jar. The fabric covers the colors and patterns of the jar, and they are not visible through the knit layer.

Knit a test patch with your chosen yarns so that you can calculate the number of stitches according to your handwriting. Create loops equal to the height of the edge of the box. For the box in the instructions, 20 loops were created, and this was enough for a turn under the bottom about two centimeters wide. Again, remember to leave the top edge of the box free, because the lid has to close. Knit pearl knitting (K1 1 purl, on the next layer purl the purl stitches and purl stitches, repeat) as long as the knitting strip reaches around the box. Finish the knitting and sew the ends together. Place the knitting around the box and stretch a little so that you get about 1-2 centimeters of knitting on the bottom. With the needle, pull the yarn around the knit on the base and tighten the base in place.

The cover of the cover is crocheted. Crochet 5 chain stitches and close the chain with a hidden stitch. Crochet 2 chain loops and start crocheting columns through the hole in the middle. How many columns will be on the first layer depends on the craft and the thickness of the yarn. In the example, the first floor has 10 columns. When the row is full, crochet 2 chain stitches again and start the next column row. Crochet 2 columns in each column of the previous layer, so that the circle increases evenly. Continue layers forward like this. If the circle starts to bulge, instead of two columns, crochet only one column evenly spaced. Crochet layers until you have made a circle the size of the entire cover. On the last layer, always crochet two columns and leave one column from the previous layer in between. So bar - bar - space (repeat). The last layer tapers so that it can be folded around the edge of the lid.

Wrap up the threads. Apply glue to the sides and lid of the jar, and place the knitting around the box and the crocheted circle on top of the lid. Now your box looks like it's covered in whipped cream.

With pink thread, crochet chain loops so long that it extends one and a half times around the cover. Crochet 2 double crochets in each chain stitch. The result is a nicely curling ribbon. Crochet a similar strip from the white yarn, but slightly shorter than the pink one.

Sew the curly strips around the edge of the cover with small and invisible stitches, for example with sewing thread. Now you have squeezed the nice frostings on top of the cake.

You also need strawberries for the cake. Using a plate, draw a circle on the red fabric and divide it roughly into three parts. The division is not very precise; strawberries aren't exactly the same size either.

Turn one part into a triangle and sew the edges closed from the wrong side.

Turn the sewn strawberry right side out, fill it with cotton wool and sew a tightening thread to the edge with a few stitches. Fasten the top of the strawberry with a thread.

Cut a stem for the strawberry from green felt or fabric. Sew the strawberries to the lid with invisible stitches.

If you want, you can make even more decorations on the cake, for example crochet flowers with pink thread.
Flower: Crochet 5 chain stitches and close them with a slip stitch. Crochet 3 chain stitches. Crochet 1 long column, i.e. take two yarn turns on the hook. Leave the last thread loop on the hook, i.e. do not pull it through. Now the hook has two threads at the same time. Crochet another long treble crochet and pull the last stitch through all the stitches on the hook. Crochet three chain stitches and connect them to the center hole with a hidden stitch. This is how a flower petal is created. Depending on the thickness of the yarn, crochet 4-5 petals into the flower. Attach the flowers to the edges of the cake by sewing.
When the decorations and icing are attached to the cake, the table's eye-catcher is ready. The party can begin!
With this guide, Tuunaritarina celebrates Kässä Kirpu's 2nd birthday.
When you finish your wonderful cake and post a picture of it on Facebook, please also tag @tuunaritarinat and @kassakirpu in your post.
#kakkupkki #tunanaritarinat #kässäfläppu #cashfläppu
#recycling treasures #handicrafts
Please note that @tuunaritarinoin's crafting and crafting instructions are intended for private use only. If you want to use the instructions for commercial purposes, please contact @tuunaritarinoiden Heli via Instagram, for example.
